Memperkuat TCP / IP Stack Untuk Menahan Serangan DOS
ane kasih tips dikit,,!!
ini trik untuk memperkuat pertahanan firewall dan menambah akselerasi pada jaringan ...!!
ok lanjut :
HKEY_LOCAL_MACHINE>SYSTEM>CurrentControlSet>Services>Tcpip>Parameters
[*] Buat Beberapa DWORD VALUE baru jika belum ada beri nama beserta Valuenya Masing2 sbb :
-> EnableDeadGWDetect = 0
-> EnableCMPRedirect = 0
-> EnablePMTUDiscovery = 0
-> KeepAliveTime = 300,000
-> NoNameReleaseOnDemand = 1
-> PerformRouterDiscovery = 0
-> SynAttackProtect = 2
Tab : memperkuat pertahanan firewall, memperkuat firewall , Mempercepat kecepatan Koneksi , Mempercepat Internet , kekuatan Firewall , menahan serangan DOS , memperkuat TCP IP , menstabilkan jaringan , membuat jaringan lebih cepat , Internet cepat , Firewall terbaik
Memperkuat TCP / IP Stack Untuk Menahan Serangan DOS
 20.50
20.50
 Heri Elvin Cliver
 Posted in
Trick
Posted in
Trick
[php] Google Search untuk Site kamu
18.24
Heri Elvin Cliver
ini postingan pertama saya tentang coding PHP , kali ini saya mau share Script untuk membuat Search Engine Google di Site .
langsung di code aja yah :
[PHP] Google Search For Your Site
<form method="get" action="http://www.google.com/search">

<div style="border:1px solid black;padding:4px;width:20em;">
<table border="0" cellpadding="0">
<tr><td>
<input type="text"   name="q" size="25"
maxlength="255" value="" />
<input type="submit" value="Google Search" /></td></tr>
<tr><td align="center" style="font-size:75%">
<input type="checkbox"  name="sitesearch"
value="Url" checked /> Only Search My Url<br />
<br/><center>Hacker-Newbie.Org</center>
</td></tr></table>
</div>

</form>Hasilnya jadi begini :
TAB : Script Google Seacrh, Google Script , Search Engine Script , Script untuk membuat Search Engine Google, Membuat Google , Hack google , Mesin Pencarian google , Membuat Pencarian Google , Google Search For Your Site , Google Engine , Script Google Seacrh, Google Script , Search Engine Script , Script untuk membuat Search Engine Google, Membuat Google , Hack google , Mesin Pencarian google , Membuat Pencarian Google , Google Search For Your Site , Google Engine ,
Posted in
PHP
Arsip Dr.Onno W. Purbo (admin Indonesian Go openSource)
13.30
Heri Elvin Cliver

yang pengen link Arsip Dr.Onno W. Purbo (admin Indonesian Go openSource)
Klik Disini : Here !!!
Tag : Data Dr Dr.Onno W. Purbo , Arsip Dr.Onno W. Purbo , download Data Arsip Dr.Onno W. Purbo , tempat Arsip Dr.Onno W. Purbo , Link Arsip Dr.Onno W. Purbo , Arsip Dr.Onno W. Purbo , Data Admin Indonesia Go openSource .
Posted in
Arsip
Cara Download File Scribd.com Tanpa Harus Registrasi
03.03
Heri Elvin Cliver
Tag : Cara Download File Scribd.com Tanpa Harus Registrasi , Download File Scribd.com Tanpa bayar , File Scribd.com tidak bisa di download , Download Free File Scribd.com , Download Scribd.com Gratis , Cara Download di Scribd.com , Cara mengambil File di Scribd.com , cara download di Scribd.com gratis , cara Download Langsung di Scribd.com gratis
ok kali ini Ane mau Share tentang Cara Download File Scribd.com Tanpa Harus Registrasi ..
Pertama-Tama Masuk Web Scribd.com ..
Terus Search Data Yang mau di Download
Setelah itu Copy link Scribd yang mau di Download..

Masukan Link Scribd.com Di Form di Bawah Ini ...
Dan Tunggu.. File Scribd akan Di download ..
Posted in
Trick
Tips Untuk cara cepat di aprove google Adsense
21.36
Heri Elvin Cliver

kali ini ane mau share tentang cara cepat di aprove google Adsense Cara Cepat Web Di Aprove Google Adsense diblogspot .
ok .. pertama-tama Kita telebih dahulu harus mempunyai minimal website .
Tips Pertama :
Buatlah postingan berisi tutorial berbahasa Inggris minimal 10 Posting.. dan Isi postingan harus postingan kita sendiri Tanpa copy paste
contoh : http://www.xh4x0r.com/2011/09/facebook-chat-to-restore-old-version.html
Tips kedua :
postingan Tidak berbau Porno dan Tidak berbau Hacking ..buatlah posting mengenai Tutorial atau apalah.
Tips KeTiga :
Daftarlah Site anda di Google-webmaster . Supaya Web anda bisa dikenali oleh Search Engine Google.
Tips Keempat :
Perbanyaklah Pengunjung Atau Visitor. dengan cara Tukar Backlink . atau Share di Facebook Link Website Anda. intinya buatlah Tutorial yang berbobot.
Tips Kelima :
ganti thema Web anda. jangan mamakai tema Standar
Tips Keenam :
Pakailah Domain pro contohnya .org .com .net .info dll . Jangan menggunakan domain gratis.
Tips ketujuh :
Jangan Memasukan Iklan lain . Sebelum Anda mendaftarkan Situs Anda di Google-adsense
1 lagi : perbanyaklah posting Tutorial yang berbobot and daftarkan situs anda di site page Ranking contohnya di Alexa.com
Sekian dulu tutorial ane mengenai Cara Cepat Web Di Aprove Google Adsense
Label : Cara Cepat Web Di Aprove Google Adsense , Google-Adsense , Daftar Di Google-adsense , Iklan Berbayar Google ,
Posted in
SEO
Cara membuat judul posting saja pada label
09.47
Heri Elvin Cliver
kali ini saya mau ngebahas tentang label,memang banyak sech blog yang mengangkat tentang pembahasan label pada blog,kali aja ada yang nyangkut di blog saya,..hhee

Gini gan, pernah liat kan, kalau agan klik link pada label yang muncul sederetan artikel yang ada di label itu dan tidak enak nya semua lebel muncul dengan judul dan diikuti artikelnya ,nah masalah nya sekarang,saya mau ngebahas tu link label agar supaya setiap isi dari link tersebut kita buat hanya tampilan judulnya saja..
Ok gan kita langsung ke TKP :
1. Login ke blog
2. Klik Rancangan lalu klik edit Html
3. Setelah itu cari kode berikut
<b:include data='post' name='post'/> gunakan (ctrl+f) biar lebih gampang.
4. Jika sudah ketemu dengan kode di atas ganti dengan kode dibawah ini :
<b:if cond='data:blog.searchLabel'>
<h3 class='title-only'><a expr:href='data:post.url'><data:post.title/></a></h3>
<b:else/>
<b:if cond='data:blog.pageType == "archive"'>
<h3 class='title-only'><a expr:href='data:post.url'><data:post.title/></a></h3>
<b:else/>
<b:include data='post' name='post'/>
</b:if>
</b:if>
<!--lamurdey.blogspot.com-->
5.Pratinjau dahulu,jika sudah tidak ada lagi kesalahan baru di save. Semoga berhasil :)
Posted in
Cara-cara
Cara membuat tombol berbagi di samping blog
20.35
Heri Elvin Cliver

- Login ke blog Agan
- Klik rancangan
- Tambah Gadget/add
- Pilih Html/javascript
- Setelah itu copy script dibawah ini lalu pastekan ke kotak Html/javascript :
*{margin:0;padding:0;}
* html #z33sHare{
position: absolute;
}
#z33sHare{
right:1%;width: 70px;background:transparant;border:0px solid #000000;-moz-border-radius:3px;-webkit-border-radius:3px;
position:fixed;
top: 20%;
}
#z33sHare div{
padding:6px 6px 6px 5px;
}
#stw{
margin-left:-2px;
}
#sfs{
margin-left:-5px;
}
</style>
<div id="z33sHare">
<div id="ssl-box">
<div id="stw">
<a href="http://twitter.com/share" class="twitter-share-button" data-count="vertical">Tweet</a><script type="text/javascript" src="http://platform.twitter.com/widgets.js"></script>
</div>
<div><a title="Post to Google Buzz" class="google-buzz-button" href="http://www.google.com/buzz/post" data-button-style="normal-count"></a><script type="text/javascript" src="http://www.google.com/buzz/api/button.js"></script>
</div>
<div>
<script type="text/javascript">
(function() {
var s = document.createElement('SCRIPT'), s1 = document.getElementsByTagName('SCRIPT')[0];
s.type = 'text/javascript';
s.async = true;
s.src = 'http://widgets.digg.com/buttons.js';
s1.parentNode.insertBefore(s, s1);
})();
</script>
<a class="DiggThisButton DiggMedium"></a>
</div>
</div>
<div><a name="fb_share" type="box_count" href="http://www.facebook.com/sharer.php">Share</a><script src="http://static.ak.fbcdn.net/connect.php/js/FB.Share" type="text/javascript"></script></div><div style="clear:both;"></div></div>
7. Perhatikan Tulisan right , itu bisa di ganti dengan left (kiri)
8. Dan untuk yang warna biru top : 20 % merupakan jarak ukur tinggi dari tombol share.
Selamat mencoba semoga berhasil.
Posted in
Full Tutorial Blogger
Cara menghilangkan tulisan didukung oleh blogger di blog
07.07
Heri Elvin Cliver
2.Klik rancangan
3.Klik edit HTML
4.Cari kode ]]></b:skin>
5. Copy kode dibawah ini :
#Attribution1 {
height:0px;
visibility:hidden;
display:none
}
6. Letakkan kode tepat diatas kode ]]></b:skin>
7. Klik simpan template.
selamat mencoba semoga berhasil
Posted in
Full Tutorial Blogger
Cara membuat scroll pada blog Archive
02.31
Heri Elvin Cliver

1. Login ke Acount Blogger atau Dashboard
2. Pilih Layout
3. Lalu klik Edit HTML
4. Centang dulu Expand Widget Templates
5. Cari kode yang seperti ini : <div class='widget-content'
6. Jika sudah ketemu,Tambahkan perintah style='overflow:auto; height:200px' pada kode yang berwarna Merah, sehingga menjadi seperti ini:
<b:if cond='data:title'>
<h2><data:title/></h2>
</b:if>
<div class='widget-content' style='overflow:auto; height:200px'>
<div id='ArchiveList'>
7. Atur ukuran tinggi height (200)-nya sesuai kebutuhan.
8. Pratinjau Dahulu sebelum Save.Jika tidak ada lagi kesalahan baru di Save.
Posted in
Full Tutorial Blogger
Cara menghilangkan Attribution pada blogger
20.02
Heri Elvin Cliver
Caranya cukup gampang, Anda cukup mengikuti Tutor dibawah ini :
1. Klik menu Design
2. Pilih menu Edit HTML
3. Klik Download Full Template
4. Centang " Expand Widget Template ".
5. Lalu cari ]]></b:skin>, Tekan CTRL+F untuk memudahkan pencarian.
6. Copy kode dibawah ini dan cantumkan tepat diatas kode ]]></b:skin> :
visibility:hidden;
display:none
}
7.Lalu SAVE
Posted in
Full Tutorial Blogger
Download Windows 8 Developer
19.19
Heri Elvin Cliver

Microsoft has released Windows 8 BUILD conference held in Anaheim, Calif., on Tuesday (13/09/2011). Windows 8, which introduced a new version is for developers or the so-called developer preview.
However, that does not mean you can not try it. Everyone can try it for free by downloading from the site that has been provided by Microsoft. There are three versions available for each of two 64 bit systems and one for 32 bit. Here are three versions of the following provided links to download each version.
- Windows Developer Preview English, 32-bit (x86)
- Windows Developer Preview English, 64-bit (x64)
- Windows Developer Preview with developer tools English, 64-bit (x64)
The file size of each of the above options vary, ranging from 2.8 GB to the very top, 3.6 GB for the middle and 4.8 GB for the lowest. As stated by Microsoft, Windows 8 developer preview version is not final, so after they finish downloading, you should store them on a CD or flash.
If you choose the version with "developer tools", the user can only do clean install. However, if you choose another, you can upgrade from Windows XP, Windows Vista, or Windows 7.
Before downloading, you should really understand that this operating system is not final so there is still no shortage here. You also need to ensure that the hardware has to support Windows 8. Microsoft states that all devices that support
For Windows 8 x86 (32 bit) minimum specification is a 1 GHz processor, 1 GB Ram and 16 GB of storage capacity. As for x64 (64 bit), you need a 1 GHz processor, 2 GB RAM and 20 GB of storage capacity. No matter which option will be downloaded, you need a DirectX 9 compliant GPU with WDDM drivers 1.0 or higher.
Posted in
Trick
Cara membuat readmore (baca selengkapnya) secara otomatis
19.16
Heri Elvin Cliver
Langsung aja ga perlu basa-basi.
Sebelum anda mencoba trik ini, ada baiknya anda membackup template anda terlebih dahulu, caranya :
1. Klik menu Design
2. Pilih menu Edit HTML
3. Klik Download Full Template
Langkah - langkah Membuat Readmore otomatis sebagai berikut :
1. Pergi ke menu Design, lalu klik Edit HTML.
2. Centang " Expand Widget Template ".
2. Lalu cari </head>, Tekan CTRL+F untuk memudahkan pencarian.
3. Copy kode dibawah ini dengan tepat dibawah kode </head> :
var thumbnail_mode = "float" ;
summary_noimg = 250;
summary_img = 250;
img_thumb_height = 120;
img_thumb_width = 120;
</script>
<script type='text/javascript'>
//<![CDATA[
/******************************************
Auto-readmore link script, version 2.0 (for blogspot)
(C)2008 by Anhvo
visit http://en.vietwebguide.com to get more cool hacks
********************************************/
function removeHtmlTag(strx,chop){
if(strx.indexOf("<")!=-1)
{
var s = strx.split("<");
for(var i=0;i<s.length;i++){
if(s[i].indexOf(">")!=-1){
s[i] = s[i].substring(s[i].indexOf(">")+1,s[i].length);
}
}
strx = s.join("");
}
chop = (chop < strx.length-1) ? chop : strx.length-2;
while(strx.charAt(chop-1)!=' ' && strx.indexOf(' ',chop)!=-1) chop++;
strx = strx.substring(0,chop-1);
return strx+'...';
}
function createSummaryAndThumb(pID){
var div = document.getElementById(pID);
var imgtag = "";
var img = div.getElementsByTagName("img");
var summ = summary_noimg;
if(img.length>=1) {
imgtag = '<span style="float:left; padding:0px 10px 5px 0px;"><img src="'+img[0].src+'" width="'+img_thumb_width+'px" height="'+img_thumb_height+'px"/></span>';
summ = summary_img;
}
var summary = imgtag + '<div>' + removeHtmlTag(div.innerHTML,summ) + '</div>';
div.innerHTML = summary;
}
//]]>
</script>
4. Masih pada menu Edit Html cari lagi kode berikut : <data:post.body/>
ingat, gunakan CTRL+F untuk memudahkan pencarian.
5. Apabila telah dicari ganti kode <data:post.body/> tersebut dengan kode dibawah ini :
<div expr:id='"summary" + data:post.id'><data:post.body/></div>
<script type='text/javascript'>createSummaryAndThumb("summary<data:post.id/>");</script>
<span class='rmlink' style='float:left'><a expr:href='data:post.url'>READ MORE - <data:post.title/></a></span>
</b:if>
<b:if cond='data:blog.pageType == "item"'><data:post.body/></b:if>
6. Klik Save Template dan lihat hasilnya,
7. Jika ini tidak berhasil,brarti Anda belum bruntung :D
Posted in
SEO
Windows 8 Developer PreView
10.27
Heri Elvin Cliver
BUILD Windows 8 Developer Preview
Windows Developer Preview – A Lock Screen


 Posted in
Trick
Posted in
Trick
how To make Slide Foto in Web
08.32
Heri Elvin Cliver
Go to here http://www.slide.com/
Sign Up and Login :)
Posted in
Trick
[Blackberry] An easy way to save energy
03.09
Heri Elvin Cliver
Here you can save Energy Batteries for Any Type Blackberry (Blackberry Bold, Blackberry Curve, Blackberry Curve, Blackberry Torch, Blackberry Curve, Blackberry Strom) ..
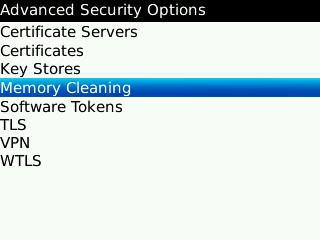
1. Go to Menu Options, select Security Options
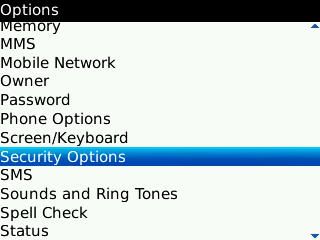
2. Go to the menu "Advanced Security Options"
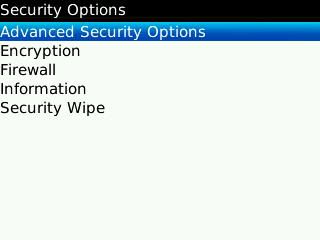
3. Then select "Memory Cleaning"
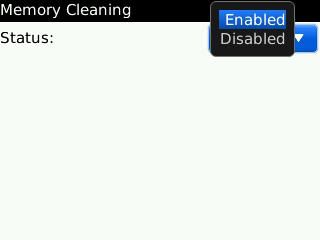
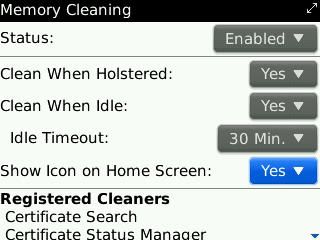
6. If so, press the BB menu icon, then select Save. And click "OK" on the warning that appears.
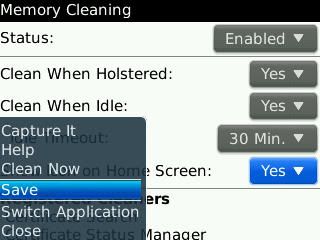
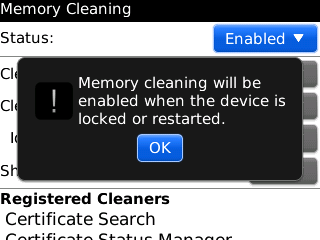
Memory Cleaner will run automatically clear the clipboard and optimizing memory on your BlackBerry. And will automatically run when your
But the effect will make your
If you do not want the old boot, you can make the choice to be disabled and do it manually Memory Clean.
Many activities can be done by the
But not everything is running normally, sometimes even your
Here are tips and ways you can use to address the full memory of your
Go to "Options" menu, then open "Security Options"
Posted in
Trick
AVIRA PREMIUM 2012 + Crack
02.35
Heri Elvin Cliver
 Posted in
Trick
Posted in
Trick
empire & allies complete cheat
19.18
Heri Elvin Cliver

1. build up the Level Faster
2.
4. automatic help neigbord
Download here : Click!!
Mirror : Click !!
How To use This..
1. First Install To your Computer
2. Open The
3. START
4. Login in to
5. Finish And Click START BOT

This my Acount :

My facebook : Click here !!
I'm level : 55
Coins : 35.293.000
and Go to Here http://indo-trick.blogspot.com/2011/09/mass-gift-material-empire-allies.html for
Mass Gift Material Empire & allies
Posted in
Trick
Download Total Video Converter 3.10 + License key gratis
18.22
Heri Elvin Cliver
Total Video Converter adalah solusi lengkap untuk video yang mendukung konversi membaca, memutar semua jenis format video dan audio dan mengkonversi mereka ke format video populer. Total Video Converter yang kuat termasuk media konversi mesin internal sehingga Anda dapat mengkonversi file media dengan kecepatan sangat cepat.
Fitur utama:
- Convert semua jenis video ke mobile video atau audios (mp4, 3gp, XviD, MPEG4 divx avi, amr audio) yang digunakan oleh ponsel, PDA, PSP, iPod;
- kompatibilitas tinggi dan efisiensi tinggi untuk Mengimpor rmvb atau RM video / audio;
- Mengkonversi berbagai video ke MPEG video yang kompatibel dengan standar DVD / SVCD / VCD;
- Rip DVD ke popular video dari semua jenis;
- Mengkonversi berbagai video ke SWF, FLV Macromedia video;
- Ambil dari berbagai audio dan video yang dikonversi untuk semua jenis audios (mp3, ac3, Ogg, wav, aac);
- RIP CD untuk semua jenis audios langsung.
avi,dat,3gp,qt,mov,mpg,mpeg,m1v,wmv,asf,ogm,mkv,dsm,vob,mp4,ra,rm,ram,amr, 3gp,3gp2,3g2,3gpp,psp,flv,fli,flc,rmvb,rpm,gif,ifo,mp3,ac3,wav,aac,aiff,au,cda,mp2.
- MPEG4(.mp4)
- 3gp(.3gp, 3g2)
- Game Psp(.psp)
- MPEG1(.mpg, mpeg)
- NTSC, PAL DVD mpeg
- NTSC, PAL SVCD mpeg
- NTSC, PAL VCD mpeg
- Ms Mpeg4 AVI(.avi)
- Divx AVI(.avi)
- Xvid AVI(.avi)
- H264 AVI(.avi)
- Mjpeg AVI(.avi)
- HuffYUV AVI(.avi)
- Swf Video(.swf)
- Flv Video (.flv)
- Gif Animation(.gif)
- Mpeg4 Mov(.mov)
- Apple Quicktime(.mov)
- FLIC format(.fli, .flc)
- Gif Animation(.gif)
- DV (.dv)
- MPEG audio(.mp3, mp2)
- Ms WAV(.wav)
- Ms WMA(.wma)
- OGG(.ogg)
- Amr audio(.amr)
- Amr audio(.awb)
- Mpeg4 audio(.m4a)
Gambaran:


Untuk mendownloadnya silahkan ke Alamat ini :
http://freedown4u.blogspot.com/2009/07/download-total-video-converter-310.html
Facebook Chat to restore the Old version
04.33
Heri Elvin Cliver
Somehow and for what purpose it's Facebook Chat makes it look like now,, hehe seh if I prefer the look of old chat, how about you?
nah actually want to post about how long balikin chat to the old facebook let ga ribet (I think) ga tau dah if teman2 who prefer the look now..

Now we can restore the look of his chat up with no add ons that are installed into our browser.
Display the picture above is my Facebook Chat in Mozilla Firefox .. loh if its only just the add ons for Firefox? if that's his question then my answer is: D This plugin is now available for the top 3 browsers, ie Firfox Mozilla, Opera and Google Chrome, now for those who want to return the Facebook Chat to the old version please download it in accordance with the Add Ons you use Browser
Download Add Ons Firefox
Download Add Ons Opera
Download Untuk Browser Chrome
Good Luck..!!
Posted in
Trick
How To Fast Buffering Youtube
10.18
Heri Elvin Cliver

Use Firefox for more leverage. Download software video accelerator or SpeedBit http:/ / www.videoaccelerator.com/download/
In order to accelerate the SpeedBit follow the way below:
1. Download Firefox AddOn, "GreaseMonkey"
2. Open your web http://userscripts.org/scripts/show/33042, and click install, then click install again, refresh the youtube video that you watched. Youtube Enhancer script will exit. After that open link http: / / userscripts.org/scripts/show/26062, and click install, then click install again. It aims if there is a new update script Youtube Enhancer, a warning message will appear at the top FIREFOX. Making it easier for us to install a new script Youtube Enhancer by clicking the install button.
3. Under View the video of the note in Very Low Quality (flv), click it. After that, there are numbers 640, 960, etc., to change the size of the video. In addition there is a picture of the skull to stop buffering, so fast is bufferingnya View In Very Low Quality (flv).
Posted in
Trick
How to Create a Website with Facebook Like This
02.19
Heri Elvin Cliver
Ok. In this article, I will try to explain briefly how to create websites that are equipped boxes like this or facebook facebook like, like the one at the box right of this page.
The first step is you have to make the fanpage first. Of course I am assuming that you already have a facebook account. Make this fan page from the main login page facebook on facebook.com.
When finished, go to the fanpage page and note the address listed at the place you used to write the website address in your browser.
There was a fanpage address you, and copy the numbers at the end of the address. This is the page id facebook fanpage you.
You can use a fanpage for the community when asked to choose.
Once ok, please go to this page http://developers.facebook.com/docs/reference/plugins/like-box facebook developers
You can choose whether to form a button or box and customize the display as desired. Paste the numbers you copied earlier into the field facebook page id.
Once done, click Get Code.
The next step is to copy the code from facebook to your web page. If you pake joomla or mambo like this prothelon.com, just create a new HTML module, and paste the code facebook is there..
Good luck.
Posted in
Trick
Mass Gift Material Empire & allies
01.46
Heri Elvin Cliver
Materials from the factory to Boost Empires and Allies! by Vincent! That's enough to make the full offensive and defensive boost:). Consider using the forum Empires and Allies in case of problems or questions or trick. On our side is still not received at the factory to boost but we still images shown to you if you are in the same situation as us! Share article with your friends to also benefit. Join our facebook page for trick or not miss any good plan already has more than 42 000. If you want energy drink, energy, war bonds or materials for your boosts and better on the page go to page 1 1 Empires and Allies

- The plant to boost costs 1000 coins, 10 100 wood and uranium!
- The plant operates as a boost to research lab. Basically you'll have to make requests to your friends to make a boost. ! We can even make boosts Level 3!
Wrench, flash grenades, printed circuit cards, blinding grenade, hazmat suit, C4 detonator referred lase, electricity supply, mini radar signal, EMC, gas detector, flash grenade
Ties of materials for the boost empires and allies:
IMPORTANT: Some boost materials such as screws, drills and C4 detonator can be obtained quickly on page 1 for 1 Empires and Allies
 |
| ClickHere !! |
 |
| Clik Here !! |
 |
| Click Here !! |
 |
| Click Here !! |
 |
| Click Here !! |
 |
| Click Here !! |
 |
| Click Here !! |
 |
| Click Here !! |
 |
| Click Here !! |
 |
| Click Here !! |
 |
| Click Here !! |
 |
| Click here !! |

 |
| Click here |
 |
| Click here !! |
Posted in
Trick


